
If you’re wondering how to waterproof a basement, you’re in the right place.
We’ll cover a few simple fixes to try and when it’s best to call a structural expert to install a permanent waterproofing fix.


We partnered with Networx to save you big money on your next home renovation project. And quotes are free!
Basement Leaking Water?
Basements in homes have all types of uses. A spare bedroom. A rec room. A workshop. A sound studio. No matter how it’s being used, one thing that strikes fear in a homeowner’s heart is the phrase “wet basement.”
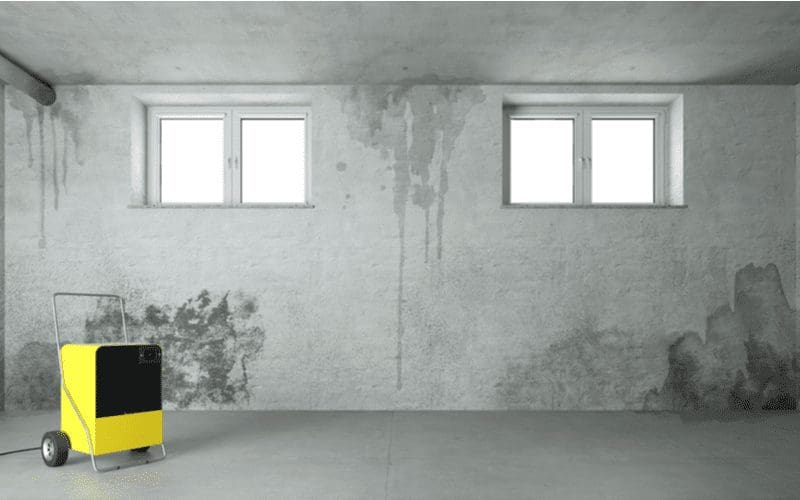
Aside from potential foundation issues, mold can also form. To fix a wet basement, figure out if it is caused by overly humid air or wet soil.
To dry the air, install a dehumidifier. Waterproofing may call for sealing cracks, improving grading, repairing downspouts, and more. Read on to learn about each one of these methods.
Diagnosing the Problem

To find out what’s causing the moisture, tape a 1-foot-square piece of aluminum foil to the inside of your basement walls and leave it in place for 24 hours.
If there’s condensation on the outside of the foil, you have high humidity in your basement. Fix it with a portable room dehumidifier or a whole-house humidifier system.
If the foil has condensation on the inside surface (next to the wall), it may be that the soil around your house is naturally damp from a high water table or poor soil drainage. In that case, the solution is to waterproof your basement.
How to Waterproof a Basement
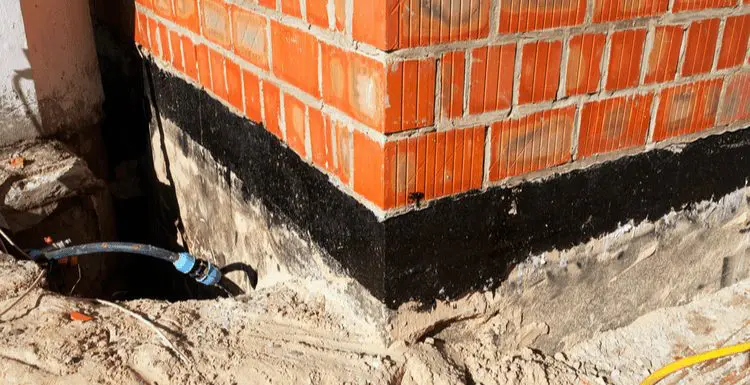
The first step in waterproofing is trying to figure out what is causing the dampness. Typically, cracks in the foundation are the culprit.
Also, check the grading around your home, downspouts for any leaks or pooling (one of the most typical causes), and cracks in the driveway.
Fix problems you encounter outside of the basement before sealing your below-ground living space. The waterproofing process may appear complicated, but these five steps break it down into a manageable project:
- Clean the Area
- Plug Holes
- Fill Cracks
- Seal Openings
- Apply Waterproof Coating
But first, here’s a video from our friends at American Dry Basement Systems recapping the steps—it’ll save you a bunch of time!
1. Clean The Area
As with any home repair project, cleaning the area to be fixed ensures that the project won’t fail from unwanted contaminants in the solution.
Also, since you are dealing with water, all surfaces must be free of dirt, dust, mold, and anything that could affect the last step, sealant coating. Any existing coatings on the surface, wall, or floor must be removed.
You can remove old paint with a wire brush, sandblaster, or other methods. For basic cleaning, fill a five-gallon bucket about halfway with warm water.
Next, use a long-handled scrub brush to scrub the walls of all dust and dirt. Refill the bucket halfway with clean, warm water, add 3/4 cup of grease-cutting liquid dish soap (like Dawn), and scrub the walls again.
If the walls have noticeable spots of mold, add a cup of oxygen bleach to the bucket. After scrubbing the walls clean, rinse them with warm water and allow them to dry overnight.
2. Plug Holes
Carefully inspect the walls for any holes or areas that are not flush with the wall. If your basement has concrete block walls, check between the blocks for any missing mortar.
Be sure and examine any penetration points—areas where pipes, ducts, or conduit may protrude. Water has a way to get through even the slightest imperfection, so use a flashlight.
Use a ball-peen hammer and knock off all loose concrete in and around the hole. Be sure to have a bucket in case this lets in more water.
The next step is to apply cement to seal the holes. Sealing water leaks with cement has been occurring for hundreds of years. The origin of hydraulic cement goes back to ancient Greece and Rome.
The materials used were lime and volcanic ash that slowly reacted with water to form a hard mass. So yes, we are still using water to stop a water leak. The easiest way to plug holes is to use three parts hydraulic cement and one part water.
Creating the cement is not difficult. Using a margin trowel, mix well, then press the mixture into any holes or divots and all penetration points. The hydraulic cement sets in 5 minutes or so.
3. Fill Cracks
Cracks in basement walls are not uncommon. The typical cause is stress points being created when lines for water, electricity, or sewer are being installed. Most cracks are usually less than 1/8 inch wide.
These can be filled using a caulking gun and an epoxy-based resin. Hydraulic cement should be used for cracks up to 3/4 inches. Anything wider than 3/4 inch could indicate foundation problems.
Also look for signs that the interior walls have bowed inward. These are indications of a severely weakened wall that can fail. Even if it has been stable for a while, it indicates the wall can no longer reliably support the load it’s supposed to carry.
If your basement has this problem, our advice is to ask a local general contractor or building official to direct you to a structural engineer who can examine the wall and surroundings and suggest the correct method to reinforce the wall.
4. Seal Openings
The general rule of thumb is to use caulk for openings of 1/4 inch or less and spray foam for openings up to 3 inches. Be sure to seal basement ceilings that go to the floor above.
However, don’t fill the gap between the floor and the wall. These gaps exist because of the way the foundation footings are poured before the concrete walls of the basement.
When the walls are poured, they connect with the foundation via a keyway, which keeps them properly aligned. When the walls have cured, the floor of the basement is poured.
The gap between the walls and basement floor is known as the cove joint. The cove joint can leak following heavy rain when the groundwater around your home rises.
It finds areas around your home’s foundation to enter, and the cove joint is a common entry point. If the rain persists, the water forces its way through these gaps, creating what is known as hydrostatic pressure.
The logical solution might be to fill these gaps with a sealant, but that is only a temporary fix.
Generally, it will fail because either the water will find another gap to enter your home via a crack in the foundation or the sealant will fail over time, rendering the sealant useless.
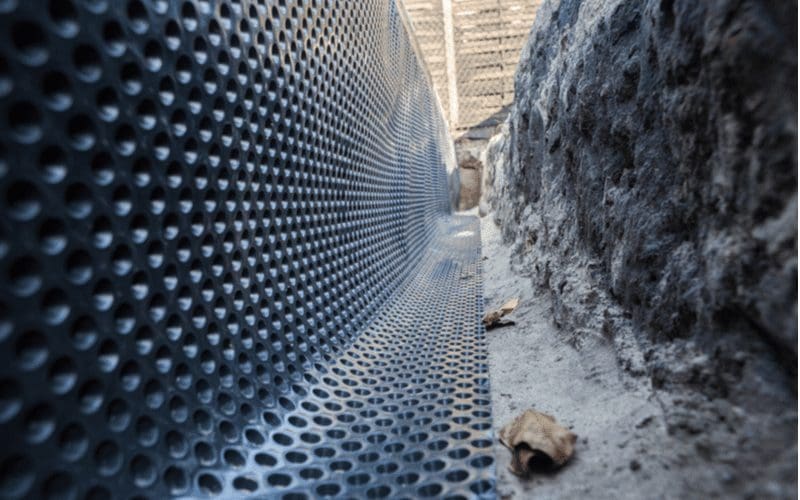
Hydrostatic pressure causes the water to work its way around or through the resistance. The best solution for leaky cove joints is a drain tile system installed underneath your basement floor.
It’s like having a gutter under your basement, directing water away, and reducing the hydrostatic pressure. These are typically installed with plastic pipes and use a sump pump to push the water out.
5. Apply Waterproof Coating
The final step is to apply high-quality waterproof paint to your interior basement walls. Two coats will ensure that moisture seepage is controlled.
The length of time waterproofing lasts depends on a few factors, including the amount of waterproofing product used, the climate, and the severity of the initial damage. Most products are warrantied for ten years.
These simple yet effective guidelines will provide your basement with a proven barrier that will keep water from entering your basement for years to come.
The peace of mind that comes from knowing you have diverted water away from your below-ground living area is worth the time and materials needed to make this problem a thing of the past
We partnered with Networx to save you big money on your next home renovation project. And quotes are free! ![]()
![]()
So, How Do You Waterproof a Basement?

Lusia599/Shutterstock
Waterproofing a basement isn’t a quick fix. And it almost always requires being quite handy. While sealant and caulking can temporarily fix a problem, we highly suggest calling a pro.
After all, you’re dealing with the structure of your home, and if you get it wrong, you can cause major damage and even create health concerns like mold.
To connect with a pro, simply click the green button above. After entering some basic information, you’ll be paired with a local waterproofing expert to fix the problem for good.