Can you paint a bathtub? If so, what are the steps you’ll need to take to do it?
If you’re asking either of these questions, click here. We’ll cover things to consider, frequently asked questions, and much more.
Can You Paint a Bathtub?
Painting a bathtub is possible, but you need to use the right materials and prepare the surface of the tub.
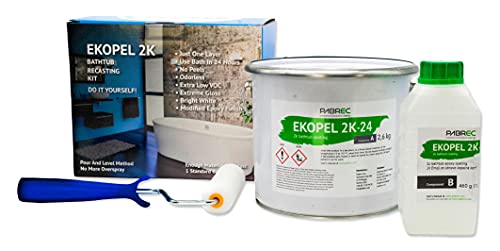
The easiest solution is to use a tub and tile kit, which typically contains epoxy paint.
How to Paint a Bathtub
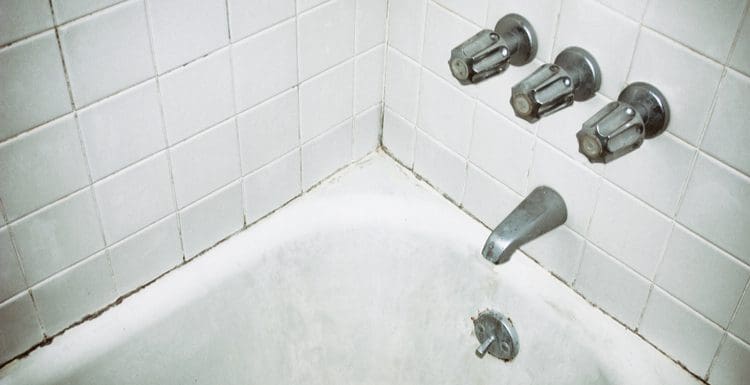
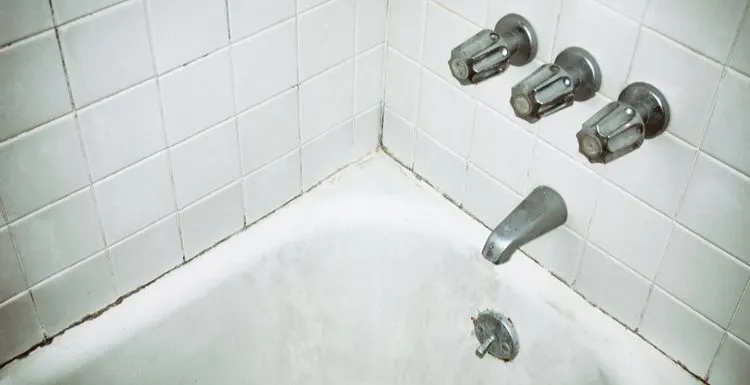
The surface of your bathtub may eventually show signs of wear. Scratches, nicks, and chips decrease the appeal of the bathroom and increase the rate of deterioration.
Luckily, you can paint most types of bathtubs without too much trouble. Bathtubs are typically made from fiberglass, porcelain, acrylic, cast iron, steel, marble, or ceramic.
Marble and fiberglass tubs are coated with a layer of gel-coat resin. Porcelain, ceramic, cast iron, and steel tubs include a porcelain enamel layer.
Acrylic tubs are reinforced with a fiberglass layer and coated with a protective layer. Paint can adhere to the outer layer of these tubs, but you need to use a specific type of paint and prepare the tub before starting.
Here are the steps involved in painting a bathtub:
- Gather supplies
- Remove the hardware and caulk
- Prepare the bathroom
- Clean the tub
- Fill scratches and chips
- Protect surrounding surfaces
- Prime the bathtub
- Prepare the Epoxy mix
- Paint the bathtub
Be prepared to not use your bathtub for at least several days. The project may take more than one day, as preparing the tub involves a lot of work. You also need to allow the paint to dry before using the tub, which may take two or three days.
1. Gather Supplies for Painting a Bathtub
You need several items to complete this project:
- Paintbrush, roller, or spray gun
- Epoxy paint or tub and tile kit
- Epoxy primer
- Screwdrivers and wrenches
- Caulk remover
- Abrasive bathroom cleanser
- Cleaning rags and scrubby pads
- Bleach
- Acetone
- Epoxy putty
- Putty knife
- Sandpaper
- Painter’s tape and tarps
The most important item is the paint. You can purchase epoxy acrylic paint or buy a premade tub and tile kit. Tub and tile kits are made specifically for refinishing bathtubs and bathroom tile.
Epoxy paint typically comes in two parts. One container holds an epoxy resin, while the other contains the hardener.
The two ingredients are mixed and applied to the tub immediately. Whether you choose to buy paint or a kit, you should also use an epoxy primer. The primer is added before the paint to create a better surface for the epoxy.
2. Remove the Hardware and Caulk
Turn off the water to the tub and remove all hardware, including the faucet, showerhead, and drain cap.
Apply a caulk remover to the caulk around the edges of the tub. Caulk remover is a liquid that softens the caulk to make the sealant easier to remove.
Use a caulk removal tool or a utility knife to scrape the softened caulk. If you use a utility knife, proceed slowly to avoid scratching the tub and surrounding material.
The softened caulk should come off easily. Yet, you may need to use a putty knife or a toothbrush to remove some of the remaining residue.
3. Prepare the Bathroom
Epoxy paints are non-toxic, but the cleaning supplies that you use to clean the tub may release chemicals into the air.
The paint also carries a strong odor. Keep the bathroom ventilated. Open the doors and windows, or turn on a fan.
You may also want to wear a mask to shield against small airborne particles. Clear out any objects that you want to protect from paint, such as bathroom supplies, mats, and towels. Remove the shower curtain or shower door.
4. Clean the Tub
Clean the tub to remove grime, mildew, and soap scum. Start by soaking the inside of the tub with a solution of 10% bleach and 90% water. Allow the bleach solution to sit in the tub for at least 10 minutes before rinsing and scrubbing.
Use an abrasive bathroom cleanser and scrubby pads to remove stubborn debris. You want the bathtub to be as clean as possible before you encapsulate the surface with paint.
Use an acetone product, such as paint thinner, to remove lingering grease and oils from the cleaning products. Apply a small amount of acetone to a rag and wipe it across the surface of the bathtub.
5. Fill Scratches and Chips
Your bathtub may have chips and gouges. If you don’t repair imperfections before painting, the marks will remain visible.
Use epoxy putty to fill the scratches and marks on the tub. The putty is applied with a putty knife. Allow the putty to dry completely.
Sand the entire tub using 400-grit sandpaper, followed by 600-grit sandpaper. Most bathtubs are made with a smooth resin, enamel, or epoxy finish. Sanding the tub helps rough up the surface of the finish.
After sanding the tub, rinse the surface with water and wipe it clean with rags or towels. Allow the bathtub to dry entirely before painting. Use wads of paper towels to soak up excess moisture.
6. Protect Surrounding Surfaces
Use painter’s tape to mask the surrounding bathroom tile and surfaces. Protect any surfaces adjacent to the bathtub that you don’t want to risk painting.
7. Prime the Bathtub
Use an enamel acrylic primer to paint the entire surface of the bathtub. Apply a light layer.
If you’re worried about brushstrokes, use spray paint. You can achieve an even coat in less time. Just make sure that you use acrylic enamel paint.
The primer must be completely dry before moving to the next step. Check the label on the primer to see the manufacturer’s recommended drying time.
8. Prepare the Epoxy Mix
Epoxy paint and tub and tile kits may include premixed paint or two separate containers. If you buy two-part epoxy, mix the two ingredients.
Follow the manufacturer’s instructions to ensure that the ingredients are properly mixed.
Pour about half of the mixture into a container and cover it to keep it from drying out. The half that you save is needed for applying a second coat to the tub.
9. Paint the Bathtub
Use a paintbrush or roller to paint the bathtub. Start in the top corner of the tub and work your way across the top before painting the interior and bottom.
Use your brush or roller to smooth out major drips, but do not worry about smoothing out every little brushstroke.
Epoxy paint is self-leveling. The brush marks and bubbles should gradually smooth out as the paint settles.
Allow the first paint coat to partially cure, which may take about 24 hours. Epoxy paint takes at least 72 hours to fully cure. If the first layer fully cures, the second layer won’t form a strong bond.
Apply the second layer to the bathtub and allow it to fully cure before using the tub. Wait at least three days. After the paint has cured, remove the painter’s tape. Re-caulk the bathtub and reinstall the hardware.
Can You Paint a Tub Surround?
Yes, you can paint a tub surround. However, epoxy paint may not effectively adhere to the surface using a brush or a roller.
For best results, use spray epoxy paint or a spray gun. Before painting the surround, clean the surface and lightly sand with fine-grit sandpaper.
So, Can You Paint a Bathtub?
Before painting a bathtub, you need to remove caulk, hardware, dirt, and grime.
You also need to sand the tub and wipe it clean. Paint the tub with epoxy paint or a tub and tile kit.